
TL;DR:
- Latte art is created by pouring steamed microfoam into espresso, forming patterns like hearts or rosettas. Producing quality designs requires a well-pulled espresso shot, properly textured milk, and precise pouring technique, achievable at home with the right tools and practice. Consistent repetition, patience, and understanding of foam and pour control are essential to developing skill and creating visually appealing coffee art.
Latte art is the practice of pouring steamed milk with a velvet-smooth texture into espresso to create visible patterns like hearts, tulips, and rosettas. Mastering how to make latte art at home comes down to three skills: pulling a quality shot with crema, steaming milk to the right microfoam texture, and controlling your pour. You do not need a commercial espresso bar setup to get real results. With the right tools, the right milk, and deliberate practice, you can produce designs that look as good as anything in a specialty café.
What tools and ingredients do you need for latte art?
The foundation of every latte art design is a well-pulled espresso shot with a thick, golden crema layer. Crema acts as the canvas. Without it, your poured milk simply sinks into the coffee and disappears. If you want to understand crema’s role in latte art, that knowledge alone will sharpen your results faster than any pouring drill.
Here is the core equipment you need before attempting any design:
- Espresso machine with a steam wand. A machine like the Breville Barista Express or De’Longhi Dedica gives you both espresso and steam in one unit at a home-friendly price.
- Stainless steel milk pitcher. Use a 12 oz pitcher for single lattes and a 20 oz pitcher for larger drinks. Stainless steel conducts heat evenly and lets you feel the temperature through the metal.
- Milk thermometer. A clip-on thermometer removes the guesswork. Steaming to 150-155°F creates glossy, velvety microfoam with no large bubbles, which means your designs will hold their shape.
- Fresh espresso beans. Stale beans produce weak crema. Use beans roasted within the last two to four weeks.
For milk, whole milk is the gold standard for beginners. Its fat and protein content creates stable, creamy microfoam that pours predictably. If you prefer plant-based options, barista-style oat milk is the next best choice. Standard grocery store oat milk has too much water content and collapses under steam pressure.
Pro Tip: Chill your milk pitcher in the freezer for five minutes before steaming. Cold milk gives you more time to control the steaming process before hitting your target temperature.

How do you steam milk to create the perfect microfoam?
Microfoam is not simply frothed milk. It is milk that has been stretched with air and then textured into a uniform, glossy consistency with bubbles so small they are invisible to the naked eye. The two-phase steaming method prevents bubbly, unstable foam and is the technique every skilled barista uses.
Follow these steps in order:
- Purge your steam wand. Release steam for one second before inserting the wand into milk. This clears condensed water that would dilute your foam.
- Position the wand just below the surface. Angle the pitcher so the wand tip sits about half an inch below the milk surface and slightly off-center. This sets up the whirlpool motion you need in phase two.
- Stretch the milk (phase one). Lower the pitcher slightly so the wand tip breaks the surface. You will hear a soft hissing sound. This introduces air. Complete air introduction before milk reaches 100°F to prevent large, unstable bubbles from forming.
- Texture the milk (phase two). Raise the pitcher so the wand tip is submerged again. The milk should spin in a tight whirlpool. This phase integrates the air you introduced and creates the silky texture.
- Stop at 150°F. Remove the wand before the milk gets too hot. Overheated milk loses sweetness and foam structure.
- Swirl and tap. After steaming, swirl and tap the pitcher on the counter to break down any remaining surface bubbles and integrate the foam fully.
Keeping steamed milk below 65°C (149°F) preserves foam structure and natural sweetness, which directly improves latte art consistency. Source: La Marzocco
Pro Tip: After steaming, rest your pitcher for 10 to 15 seconds before pouring. This stabilizes the microfoam and gives you the best pouring window. Do not wait longer than 30 seconds or the foam will begin to separate.
How to pour latte art step by step: hearts, tulips, and rosettas
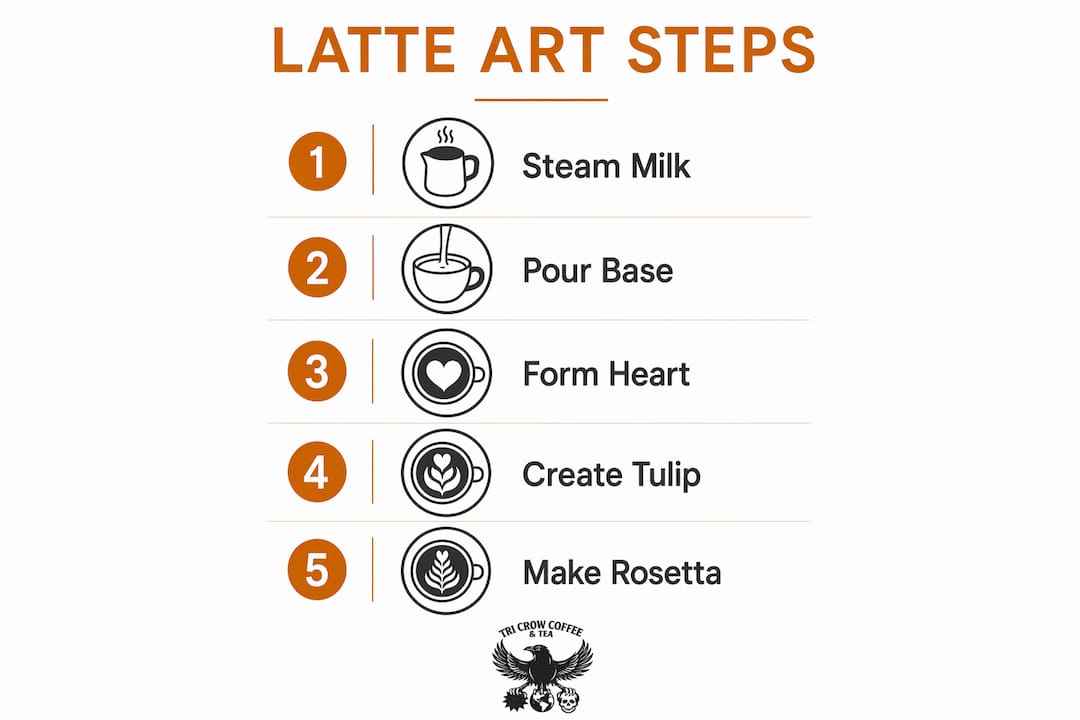
Most beginners focus too much on steaming quality and overlook pour height, which critically impacts design visibility. The pour has two distinct phases, and getting the transition between them right is what separates a visible design from a muddy brown cup.
Here is the step-by-step process for your first pours:
- Tilt your cup at about 20 degrees. This pools the espresso toward one side and creates a deeper liquid base for the milk to flow into. Tilting the cup enables better contrast when you begin laying down the white foam design.
- Start pouring from 4 to 6 inches above the cup. At this height, the milk flows under the crema layer and mixes with the espresso. The cup fills without disturbing the surface.
- Lower the pitcher to about half an inch above the surface. Once the cup is roughly half full, bring the pitcher spout close to the liquid surface. At this distance, microfoam floats on the crema rather than sinking, and your white design becomes visible.
- Begin your design. Use the techniques below based on which shape you are attempting.
Heart
Pour a steady stream low and close to the surface. When you see a white circle forming, increase the flow slightly and then draw the pitcher forward and upward through the circle. The forward cut splits the circle into a heart shape. Keep the motion smooth and deliberate.
Tulip
Pour one small burst of milk low to create a white dot, then pause. Pour a second burst slightly behind the first. The second dot pushes the first forward, creating a stacked petal effect. Repeat for a third layer, then finish with a thin forward cut through the center.
Rosetta
This is the most technically demanding beginner design. Pour low and close, then wiggle the pitcher side to side in a steady rhythm as you slowly pull it backward toward the far edge of the cup. Finish with a thin forward cut through the center of the pattern.
Here is a quick comparison of the three designs by difficulty and technique:
| Design | Difficulty | Key motion | Common mistake |
|---|---|---|---|
| Heart | Beginner | Forward cut through circle | Cutting too early before circle forms |
| Tulip | Beginner to intermediate | Stacked bursts with pauses | Pouring too fast between layers |
| Rosetta | Intermediate | Side-to-side wiggle with backward pull | Inconsistent wiggle speed |
What are the most common latte art mistakes and how do you fix them?
Every home barista hits the same walls early on. Knowing what causes each problem cuts your learning time significantly.
- Large bubbles in foam. You introduced air too late in the steaming process or held the wand too far above the milk surface. Fix this by starting the stretching phase immediately after purging the wand, and complete all air introduction before the milk hits 100°F.
- Design sinks into the coffee. You are pouring from too high when you try to lay down the design. The milk is going under the crema instead of floating on top. Lower the pitcher spout to within half an inch of the surface before you begin the design phase.
- Weak contrast between white and brown. Your microfoam is too thin or too airy. This usually means you over-aerated in phase one. The foam should look like wet paint, not shaving cream.
- Design falls apart as the cup fills. You waited too long after steaming. Pour within 30 seconds of steaming to maintain foam quality before separation begins.
- Uneven or shaky pour lines. This is a muscle memory issue, not an equipment issue. Practice your pouring motion with a pitcher of water and a drop of dish soap. The soap creates a foam-like surface that mimics milk behavior without wasting ingredients.
Pro Tip: Clean your steam wand immediately after every use. Milk residue bakes onto the wand tip within minutes and creates uneven steam pressure that ruins your next foam texture.
Can you make latte art with alternative milks or basic equipment?
Yes, but the results depend heavily on which alternatives you choose. Barista-style oat milk consistently steams well and produces microfoam with good texture, making it the top plant-based choice for latte art. Standard oat milk, almond milk, and rice milk have water content that is too high to hold foam structure under steam pressure.
Here is how to adapt your approach based on what you have available:
- Barista oat milk. Steam it the same way as whole milk, but stop at 140°F rather than 150°F. It scorches faster and loses texture quickly above that point.
- Barista almond milk. Works reasonably well but produces thinner foam. Keep your pour slow and deliberate to compensate for reduced foam density.
- Handheld frother. You can approximate microfoam by frothing cold milk for 20 to 30 seconds, then heating it in a saucepan to 140°F. The texture will not be as uniform as steam wand foam, but it is workable for simple heart designs.
- French press method. Heat milk to 140°F, pour it into a French press, and pump the plunger rapidly for 30 seconds. This creates a coarser foam that suits tulip designs better than rosettas.
- Practice without milk. Fill your pitcher with water and a small drop of dish soap. Water and soap mimic milk texture well enough to practice your pour height, cup tilt, and design motions without wasting milk or pulling extra shots.
If you are working without a steam wand, focus on simple designs first. A heart requires less foam precision than a rosetta, so it is the right starting point for any equipment setup. For a deeper look at pulling the espresso foundation that makes all of this work, the home barista’s guide at Tri Crow Coffee covers the full process.
Key takeaways
Latte art requires quality microfoam, precise pour height, and consistent muscle memory built through deliberate repetition.
| Point | Details |
|---|---|
| Microfoam temperature | Steam milk to 150-155°F for stable, glossy foam with no large bubbles. |
| Two-phase steaming | Stretch air in before 100°F, then texture with a whirlpool to create silky microfoam. |
| Pour height controls design | Start high to mix milk under crema, then lower to half an inch to lay down the visible design. |
| Rest before pouring | Wait 10 to 15 seconds after steaming, then pour within 30 seconds before foam separates. |
| Practice without waste | Use water and dish soap to drill pour control before committing milk and espresso shots. |
Why latte art is worth every failed pour
I have watched a lot of people give up on latte art after three or four attempts, and almost every time, they quit because they expected the skill to arrive faster than it does. That expectation is the real problem, not their technique.
The honest truth about latte art is that the first twenty pours are not about making art. They are about building the physical memory of what a correct pour feels like. Your hand needs to learn the transition from high to low, the moment to slow the flow, the rhythm of a rosetta wiggle. None of that comes from reading. It comes from repetition.
What I find most useful to tell beginners is this: drink the coffee anyway. Every imperfect pour still produces a latte. The cup is not wasted just because the heart looks like a blob. That mindset shift matters because it removes the pressure that makes your hands tense up during the pour.
Small equipment upgrades make a real difference, but they are not the first investment to make. A $15 clip-on thermometer will improve your results more than a $200 pitcher upgrade. Get the fundamentals right with what you have, then upgrade when you know exactly what you need and why.
Latte art is one of those skills that rewards patience in a very visible way. The day your first clean heart appears in the cup, you will understand why the practice was worth it.
— David
Start your latte art practice with the right coffee
Every great latte art design starts with a shot that has strong, lasting crema. At Tri Crow Coffee, the Max Caf Blend is roasted in small batches specifically to produce the dense, golden crema that gives your poured designs the contrast and canvas they need. Thin crema means your milk sinks and your design disappears. The right espresso blend solves that problem before you even pick up the pitcher. Pair it with the home brewing tips on the Tri Crow Coffee blog to dial in your full setup from bean to cup.
FAQ
What milk is best for latte art at home?
Whole milk is the best choice for beginners because its fat and protein content creates stable, creamy microfoam. Among plant-based options, barista-style oat milk steams most consistently and produces the best foam texture for latte art designs.
What temperature should I steam milk to for latte art?
Steam milk to 150-155°F (60-65°C) for the best microfoam texture. Above this range, milk loses sweetness and foam structure, making designs harder to form and hold.
Why does my latte art design disappear into the coffee?
The most common cause is pouring from too high when you begin the design phase. Lower your pitcher spout to within half an inch of the liquid surface so the microfoam floats on the crema rather than sinking below it.
How long does it take to learn latte art?
Most people produce recognizable heart designs within two to four weeks of daily practice. Rosettas and tulips typically take one to three months of consistent repetition to execute cleanly, as they require more precise muscle memory.
Can I make latte art without an espresso machine?
You can approximate latte art using a Moka pot or AeroPress for concentrated coffee and a handheld frother or French press for foam. Results will be simpler, but a basic heart design is achievable with these tools and the right technique.