
Learning how to make espresso at home is one of the most rewarding skills a coffee lover can develop, and one of the most humbling. The machine looks simple. The steps seem short. Then your first shot pulls in 15 seconds and tastes like battery acid, and you realize there’s more going on than you thought. The good news: espresso is a measurable, repeatable process. Every variable has a name, a number, and a fix. This guide walks you through the equipment, the exact brewing steps, and a clear troubleshooting method so you can pull balanced, consistent shots without the guesswork.
Table of Contents
- Key takeaways
- How to make espresso: the equipment you actually need
- Step-by-step espresso brewing method
- Dialing in and troubleshooting your shots
- Machine maintenance and advanced equipment
- My honest take on the espresso learning curve
- Start with the right beans from Tri Crow Coffee
- FAQ
Key takeaways
| Point | Details |
|---|---|
| Use precise measurements | The gold-standard recipe is 18g in, 36g out, in 25–30 seconds at 93°C. |
| Adjust one variable at a time | Changing grind, dose, and temperature simultaneously makes problems impossible to diagnose. |
| Preheat thoroughly | Running water through the group head for 20 minutes prevents flat, under-extracted shots. |
| Clean your machine consistently | Daily and weekly cleaning directly affects flavor and prevents costly repairs. |
| Fresh beans matter more than gear | Stale coffee is the most common reason good equipment produces mediocre espresso. |
How to make espresso: the equipment you actually need
Espresso is not forgiving of cheap tools. That does not mean you need to spend a fortune, but it does mean understanding what each piece of equipment does and why cutting corners on certain items hurts your results more than others.
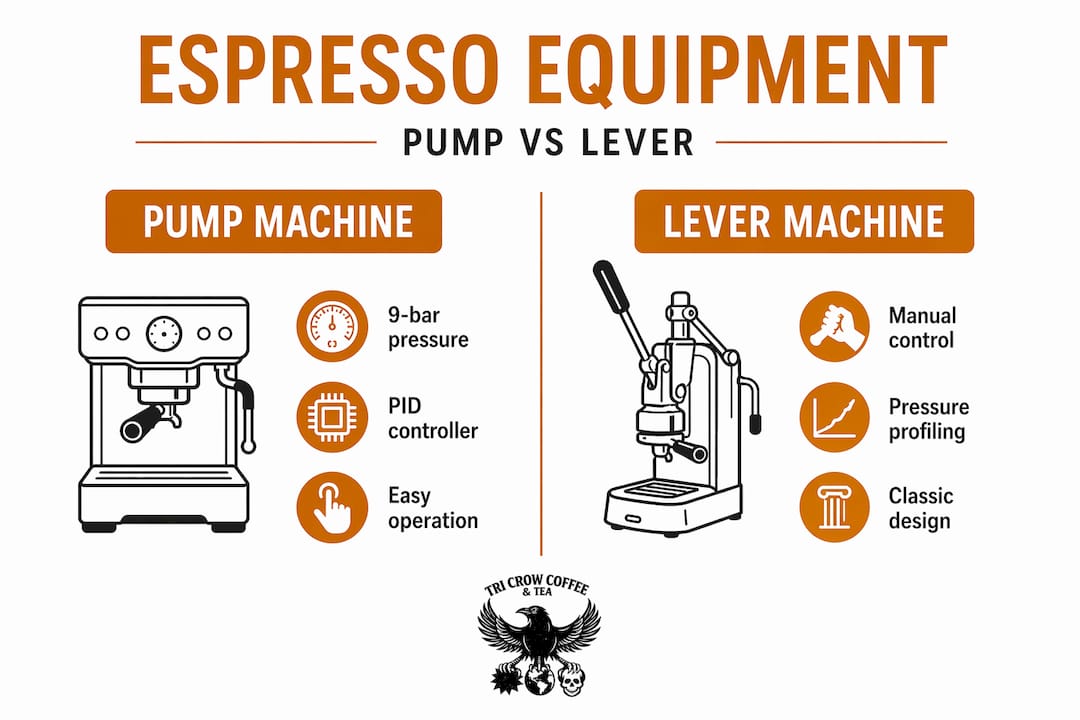
Espresso machines
Pump-driven machines are the standard starting point for home baristas. They deliver water at 9 bars of pressure, which is the target for proper espresso extraction. Machines with PID temperature controllers give you precise, stable brewing temps. Without a PID, temperature can swing several degrees between shots, and you will taste that inconsistency.
Lever espresso machines range from $200 entry-level to over $1,000 for traditional models, offering manual pressure profiles that experienced brewers use to shape extraction. They require more skill but reward you with a level of control that automatic machines cannot replicate.
| Equipment | What to look for | Why it matters |
|---|---|---|
| Espresso machine | PID controller, 9-bar pump | Temperature stability and correct pressure |
| Burr grinder | Stepless adjustment, flat or conical burrs | Precise grind size control |
| Digital scale | 0.1g precision, timer function | Accurate dose and yield measurement |
| Tamper | 58mm base, flat bottom | Even water distribution through the puck |
| Distribution tool | WDT needle tool or leveler | Eliminates clumps and channels |
The grinder is not optional
A blade grinder produces uneven particle sizes that cause inconsistent, often undrinkable espresso. A quality burr grinder with stepless adjustment is the single best investment you can make in your espresso setup. Grind-by-weight espresso grinders improve dosing precision and extraction consistency by grinding exactly the amount you need, every time. If you are deciding between upgrading your machine or your grinder, upgrade the grinder first.
Pro Tip: Buy the freshest beans you can find with a roast date on the bag. Beans roasted within the last two to four weeks will out-perform expensive stale coffee every single time. For choosing fresh beans that suit espresso’s high-pressure environment, look for medium to dark roast profiles with clear origin notes.
Step-by-step espresso brewing method
This is the core of any espresso brewing guide worth your time: a repeatable sequence where each step has a clear reason behind it.
-
Preheat your machine and portafilter. Turn the machine on at least 20 to 30 minutes before brewing. Thermal stability is achieved by running hot water through the group head, and skipping this step is one of the main reasons first shots taste flat or sour. Place the portafilter in the group head during warm-up so it reaches the same temperature as the machine.
-
Weigh and grind your dose. Grind 18g of fresh whole beans directly into the portafilter basket. Use a scale with 0.1g accuracy. Eyeballing the dose introduces inconsistency before you even start.
-
Distribute the grounds. Tap the portafilter gently on the counter to settle any large clumps. Then use a WDT tool (a fine needle tool that stirs the grounds) to break up smaller clumps and create a uniform bed. This step prevents channeling, where water finds the path of least resistance and extracts unevenly.
-
Tamp with consistent pressure. Place the portafilter on a flat, stable surface. Press straight down with 15–20 kg of pressure, keeping the tamper level. Give a light twist at the end to polish the surface. An angled tamp is one of the most common causes of channeling.
-
Lock in and start the shot. Insert the portafilter firmly and place a pre-warmed cup on a scale set to zero. Start the timer and begin the shot. Watch for pre-infusion, a brief low-pressure phase some machines run before full pressure, which evenly saturates the puck before the main extraction begins.
-
Stop at target yield. Stop the shot when your scale reads 36g of liquid. The ideal extraction window is 25 to 30 seconds at 93°C and 9 bars of pressure. Note your actual time. That number is your primary diagnostic tool.
-
Taste and record. Sip the espresso before adding milk or water. Taste for balance between sweetness, acidity, and bitterness. Write down the time, dose, yield, and your sensory notes. You will refer back to this information on the next shot.
Pro Tip: Weighing liquid yield by grams rather than measuring by milliliters is far more accurate. Crema volume is unreliable as an indicator of extraction quality because its density changes with roast level and coffee freshness.
Dialing in and troubleshooting your shots
Most beginners reach their first balanced espresso within 15 to 30 attempts when they apply a disciplined, single-variable approach. The key word is “single.” Changing grind size, dose, and temperature between the same two shots gives you data that means nothing because you cannot isolate what caused the change.
The most powerful variable to start with is grind size. If your shot pulls in under 20 seconds, the grind is too coarse. Water flows too fast, under-extracting the coffee and producing sour, thin-bodied espresso. If the shot runs over 35 seconds, the grind is too fine. Water struggles through, over-extracting and producing bitter, harsh flavors.
Here is a quick reference for the most common problems you will encounter:
| Symptom | Likely cause | Fix |
|---|---|---|
| Sour, thin espresso | Under-extraction, shot too fast | Grind finer, one step at a time |
| Bitter, harsh espresso | Over-extraction, shot too slow | Grind coarser, one step at a time |
| Uneven flow or spraying | Channeling from poor distribution | Re-do WDT step, check tamp angle |
| Flat, no sweetness | Cold machine or stale beans | Preheat longer, use fresher beans |
| Inconsistent shot times | Dose weight varying between shots | Weigh every dose on a scale |
Once your timing is in range, adjust taste by moving temperature. Higher temperatures (up to 94°C) tend to bring out more sweetness and body in medium roasts. Lower temperatures (around 90 to 92°C) work better with lighter roasts where you want clarity and fruit notes without bitterness.
Pro Tip: When troubleshooting, always fix distribution and tamping before touching the grinder. Technique issues mask the effect of grind adjustments and send you chasing a moving target.
Machine maintenance and advanced equipment
Neglecting machine maintenance directly impacts espresso taste and can lead to costly damage. Many home baristas discover this the hard way after months of shots that taste increasingly bitter without any obvious cause.
Here is what a realistic cleaning routine looks like:
- Daily: Rinse the portafilter and basket after every session. Wipe the group head gasket. Purge the steam wand immediately after use and wipe it with a damp cloth.
- Weekly: Backflush the group head using a blind basket and espresso machine cleaner. Use the correct dose of cleaning product. Too little leaves residue; too much leaves detergent flavor in your shots.
- Monthly: Descale the boiler using a manufacturer-approved descaling solution. Run the full descaling cycle without shortcuts. Remove and soak the portafilter basket and shower screen in espresso cleaner overnight.
Daily, weekly, and monthly cleaning prevents bitter, rancid oil buildup that no amount of grind adjustment can fix. Think of it as part of the brewing process, not a separate chore.
For enthusiasts ready to refine their setup further, consistent dosing is the foundation that ties every other variable together. Grind-by-weight grinders eliminate the step of weighing grounds separately and reduce workflow friction significantly.
Pro Tip: Thermal stability is often overlooked even by experienced home baristas. If you notice your first shot of the day tastes different from your second, the machine has not fully stabilized yet. Run a blank shot through the group head before your actual pull and taste the difference yourself.
My honest take on the espresso learning curve
I have seen a lot of home baristas spend $800 on a machine and then buy pre-ground coffee at the grocery store. It is a painful combination to watch. In my experience, the grinder and the beans are the two variables that move the needle most in the early stages. The machine matters, but a mid-range pump machine with a great grinder and fresh beans will beat an expensive machine with mediocre tools every time.
What surprised me most when I started taking espresso seriously was how much I learned from recording shots rather than just pulling them. Keeping a simple log of dose, yield, time, and tasting notes turns 30 attempts into a learning curve instead of 30 random guesses. Most people skip this and wonder why they cannot seem to get consistent results.
The maintenance piece is where I see the most frustration. A machine that has not been backflushed in three months will taste like it, and no amount of dialing in will compensate. I have tasted shots from poorly maintained $2,000 machines that were outperformed by well-maintained $400 machines. Clean your equipment as part of your ritual, not as an afterthought.
The real satisfaction in home espresso is not the end product. It is the process. When you pull a shot that tastes exactly like what you had in mind, and you know exactly how you got there, that is a different kind of pleasure than anything a pod machine can give you.
— David
Start with the right beans from Tri Crow Coffee
Getting your technique dialed in is only half the equation. The beans you use shape everything that technique can express. At Tri Crow Coffee, every small-batch blend is roasted to order and built specifically for the kind of intentional brewing this guide describes.
The Latin American Blend delivers the balanced sweetness and clean body that makes dialing in straightforward, especially for home baristas still building their calibration. For those who prefer something bolder, the Max Caf Blend is a rich, full-bodied option built for espresso lovers who want intensity with structure. Both are roasted in limited batches so you always know you are working with fresh, purposeful coffee. Explore the full range of best beans for espresso on the Tri Crow Coffee blog to find the right starting point for your setup.
FAQ
What is the standard espresso recipe for beginners?
The gold-standard recipe uses an 18g dose of finely ground coffee, yielding 36g of liquid in 25 to 30 seconds at 93°C and 9 bars of pressure. This 1:2 ratio is the most reliable starting point for new home baristas.
How do I know if my espresso is under-extracted or over-extracted?
If your shot pulls in under 20 seconds and tastes sour or thin, it is under-extracted. Grind finer. If it runs over 35 seconds and tastes bitter or harsh, it is over-extracted. Grind coarser. Change only one variable between shots.
Why does my espresso taste different every morning?
The most common reason is that your machine has not fully reached thermal stability. Run hot water through the group head for at least 20 minutes before brewing. Inconsistent dosing and stale beans are the other frequent culprits.
Do I need an expensive machine to make good espresso at home?
No, but you do need a quality burr grinder and fresh beans. A reliable mid-range pump machine paired with a precise grinder and coffee roasted within the past two to four weeks will produce excellent results.
How often should I clean my espresso machine?
Rinse and wipe daily after every session, backflush weekly with espresso cleaner, and descale monthly. Skipping this routine causes bitter flavors and shortens the machine’s lifespan significantly.